- Ivantha Guruge

- Aug 4, 2019
- 7 min read
Updated: Oct 21, 2020
This step-by-step tutorial shows how to add User Login into a .Net Core web application with a React front-end. The OAuth standard is applied through the use of Identity Server 4 and Redux-oidc will be handling the user state in the web application.
The source code can be downloaded from: https://github.com/ivanthagura/react-redux-dotnetcore-oidc-example-part1
Part 1 will show:
How to create a standard web application using .Net Core and React in Visual Studio.
Add an Identity Server 4 project to handle all user details.
How to wire up the front end with the Open Id Connect standard to enable users to log in to the site and use their credentials.
This application will not consist of any database logic to make things simple.
Knowledge to follow along :
Basic knowledge on C#, JavaScript, React JS and the Redux state flow.
IDEs : Visual Studio 2019, VS Code (You can use whatever IDE you prefer 😁)
Link to download Visual Studio 2019 : https://visualstudio.microsoft.com/vs/
Link to download Visual Studio Code : https://code.visualstudio.com/
.Net Core Version used (2.2) : https://dotnet.microsoft.com/download
Let's get started 😤
First off, I will be switching between the two IDEs because it is my personal preference to code C# in Visual Studio and JS in VS Code. So bear with me if it feels weird 😅
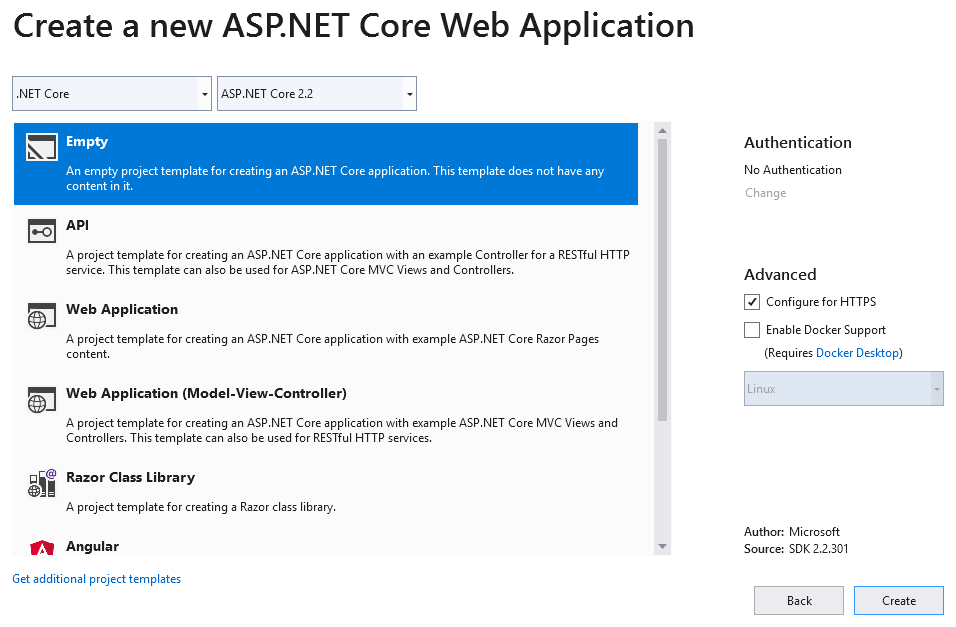
Let's go ahead and fire up visual studio. This example uses Visual studio 2019 community edition which is the free version. Let's create a new ASP.NET Core Web Application project.
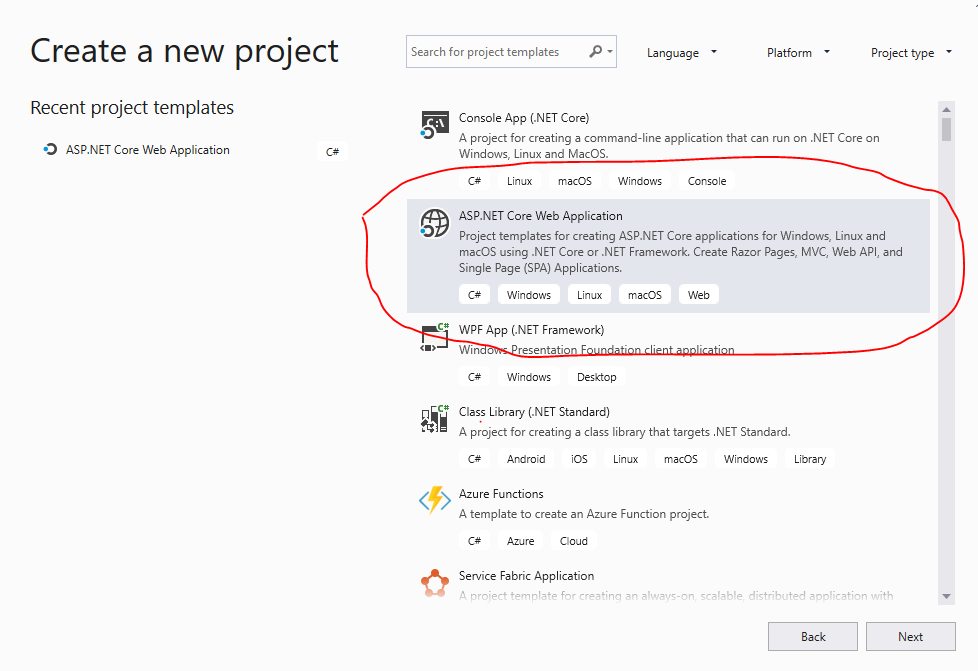
I named the app "MyWebApp". Store it in any location and hit next.
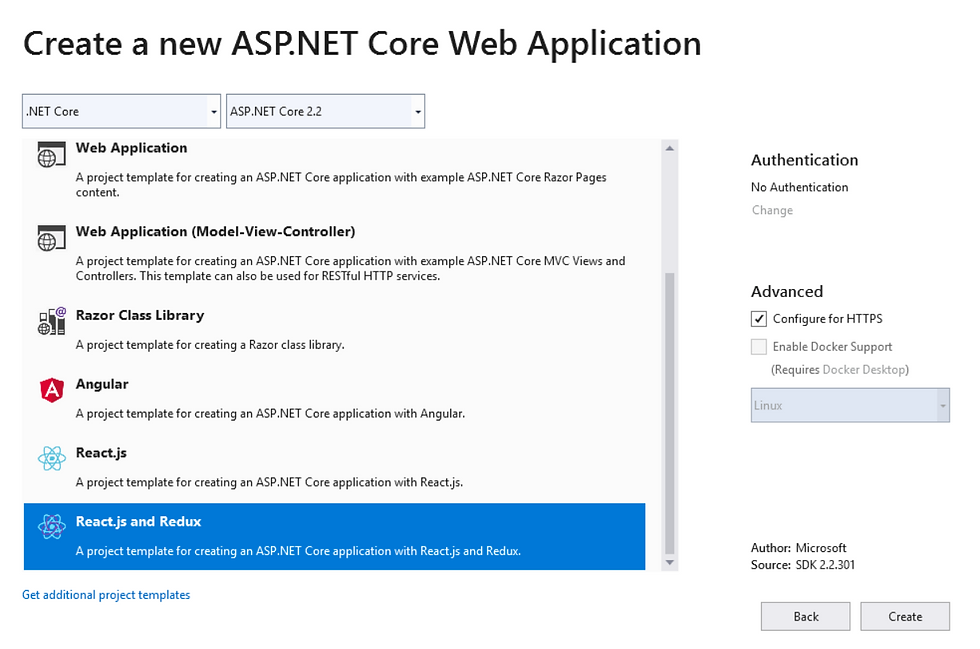
Now lets select the type of app. For this example we are going with a ReactJS and Redux application with ASP.NET Core 2.2. The 2.1 version works fine too. Make sure that "Configure for HTTPS" checkbox is checked.
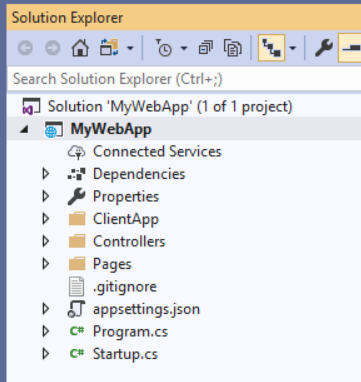
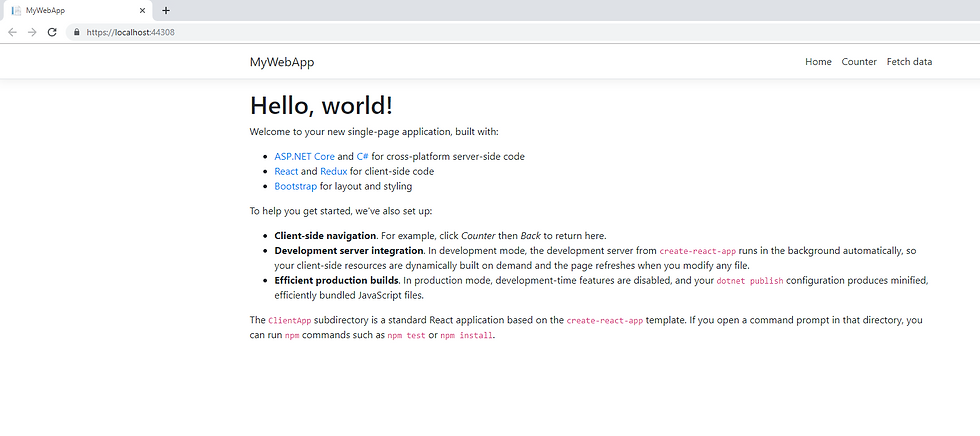
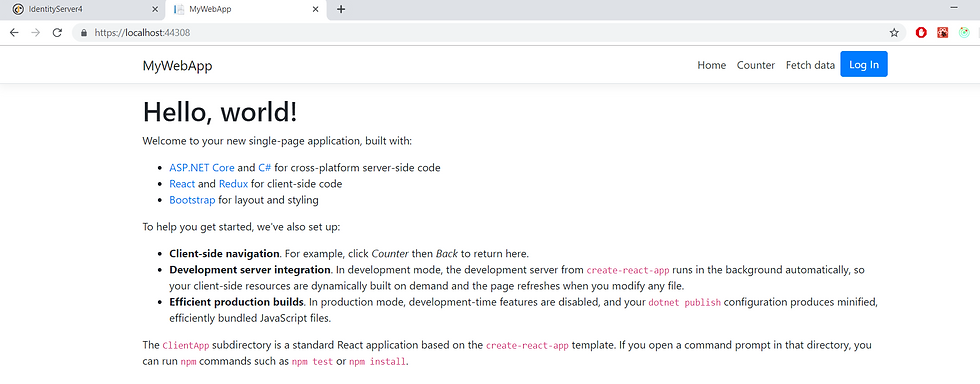
Now you will have the basic setup of a MVC application and the ClientApp, created using Facebook's Create-React-App wired with Redux to manage the application state.
Running this application (F5) will spit out a basic web application with a couple of links demonstrating how the React-Redux workflow is wired. You can click around and get the basic functionality into your head before proceeding (it may take a couple minutes the first time because it downloads a bunch of packages initially).
Now that we have everything set up, let's create the project that will host Identity Server 4. Add an empty web application to your solution.
Right click (RC) on the solution -> Add -> New Project
Select ASP.NET Core Web Application and give it a name. Since the IdServer project belongs to the company and not just the web app, I will name it with my company name and the IDP suffix (MyCompany.IDP)
Create an empty project. Ensure you are targeting ASP.NET Core 2.2
We will refer to this project as the IDP project from now on.
Now let's add the Identity Server 4 middleware.
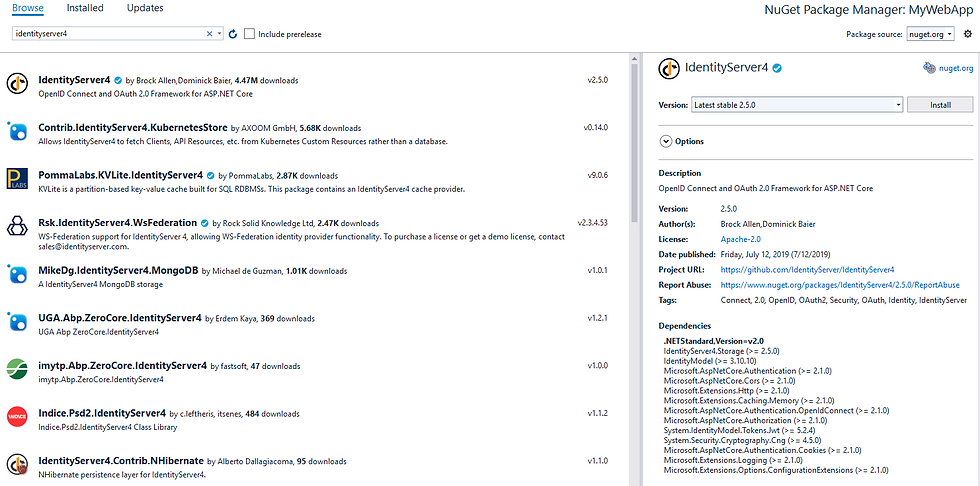
RC newly created project -> Manage nuget packages
Search for IdentityServer4 in the browse tab and install the package. At the time of writing this post, the latest stable version was 2.5.0
Next is to configure the middleware. Go the configureServices method in the IDP project Startup.cs file. Add the following line:

This will register Identity Server as a middleware in the project. Adding the developer signing credential sets up a credential to sign the tokens with. Only to be used during development.
Next, let's add a couple of test users. We will add some static users in this example and not work with a database for this demo. Create a new static class "Config.cs" in the IDP project to hold in memory configuration. The class looks like this:
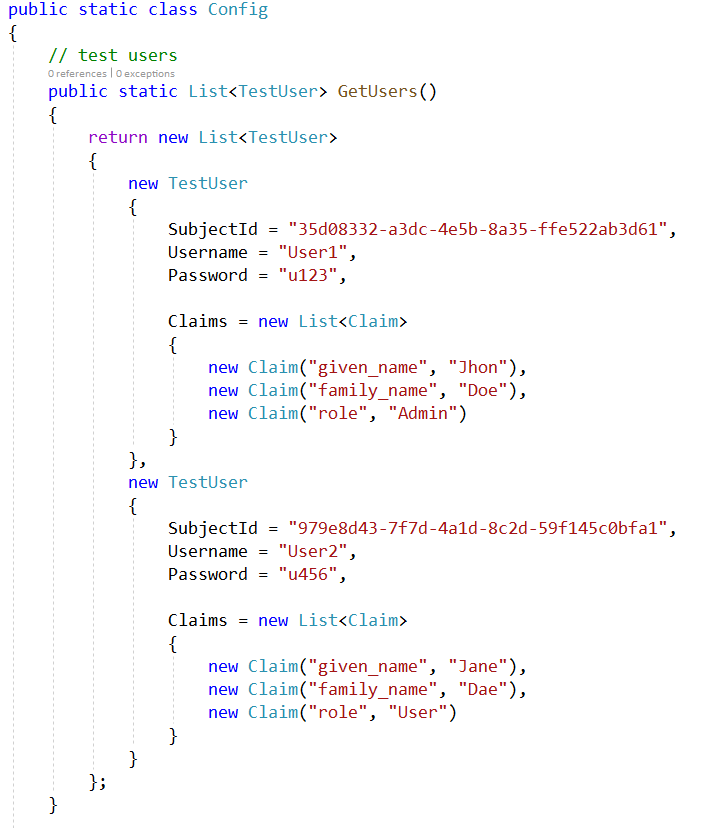
Notice the following: each user has a subject Id along with a username and password. We are also requesting the user's first name and family name as Claims, along with the user Role. Make sure that all the references are imported.
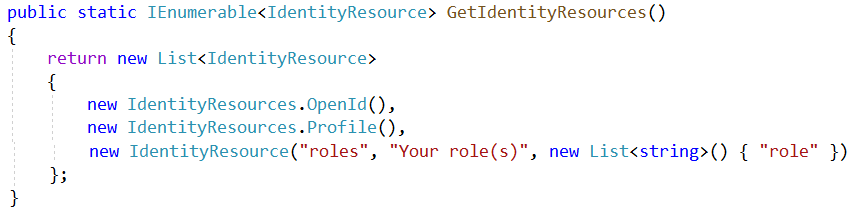
Next is adding the identity resources (scopes). Create the next method in the config class. We are requesting the Id, profile, address and the users' roles.
Last method on the config class is defining the client details. The Uris specified here are those of MyWebApp.
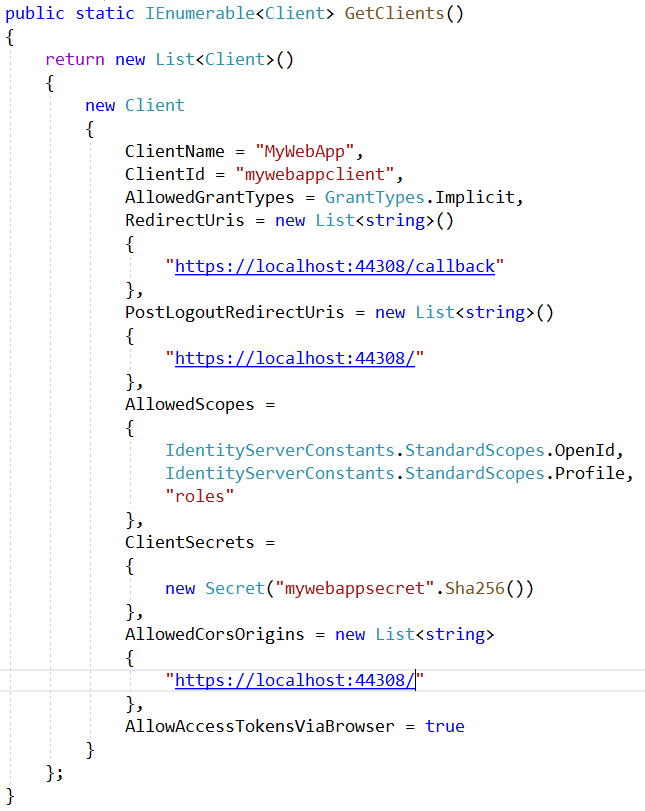
The database approach should grab all these details from the Id Server Db.
Note: The client Id and the client secret should be the same when configuring the client app in React. We will come to that soon. To get the client Uri: RC -> MyWepApp -> properties -> Debug -> App URL. Make sure you check the Enable SSL and copy that into the App URL.

Note: Do the same for your IDP project as well. Enable SSL and copy that into the App URL. In this example it is "https://localhost:44358/" for the IDP. Be careful not to confuse the two projects 😅
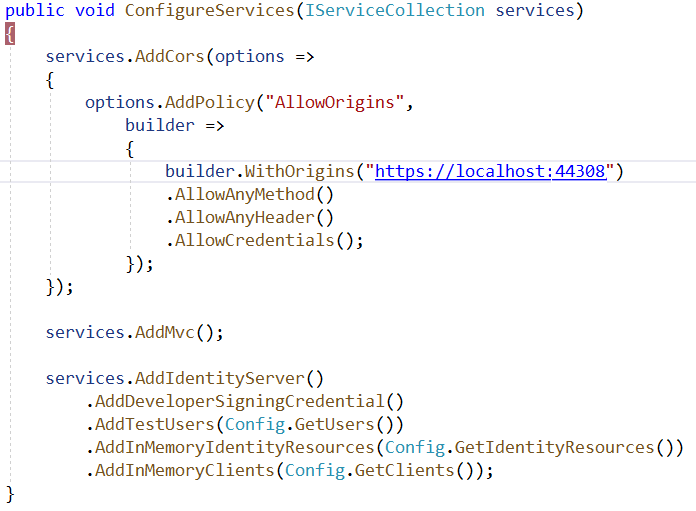
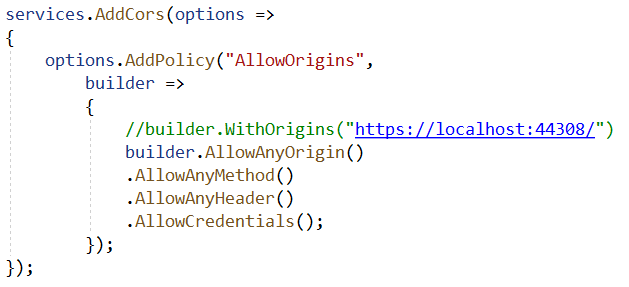
Now that we have the config values, let's move to the Startup class of the IDP project. In the configure services method: add a CORS policy so that MyWebApp can access Id Server. Then add the Identity server configurations using the config file we created. Make sure that all references are imported.
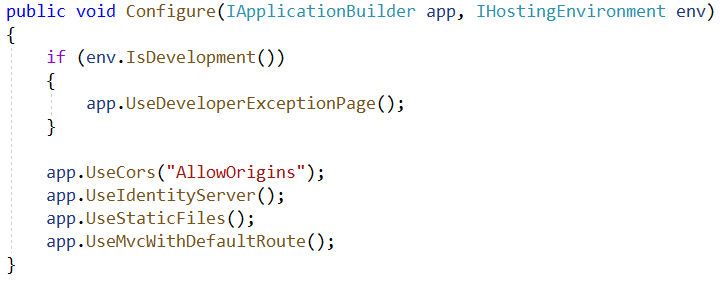
In the Configure method: add the created CORS policy along with the Identity server.
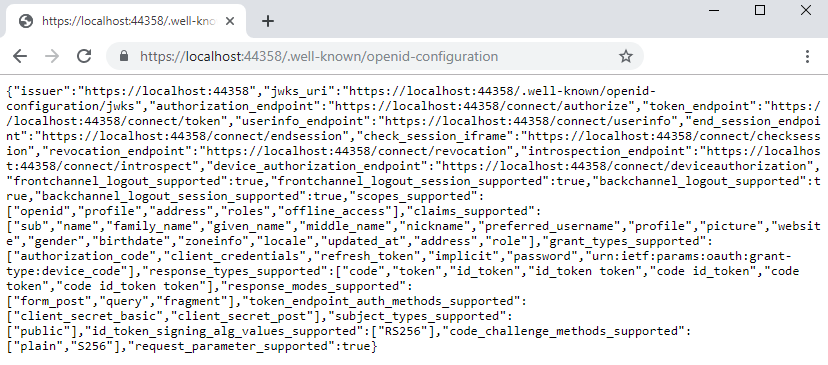
Commenting out app.UseStaticFiles(), app.UseMvcWithDefaultRoute(), running the IDP project (RC -> Project -> Set as startup project) and navigating to "/.well-known/openid-configuration" will navigate you to the discovery endpoint of the Id Server.
Now let's add the User Interface for the IDP. Go to IdentityServer4 Quickstart UI repo and let's add that into our project. There are two ways to do this:
Clone the repo and the project into the IDP
Use the powershell script provided in the repo to add it to the IDP
We will use the second approach in this example.
Open a powershell terminal and navigate into your IDP project folder
Paste the powershell command copied from the repo and run it
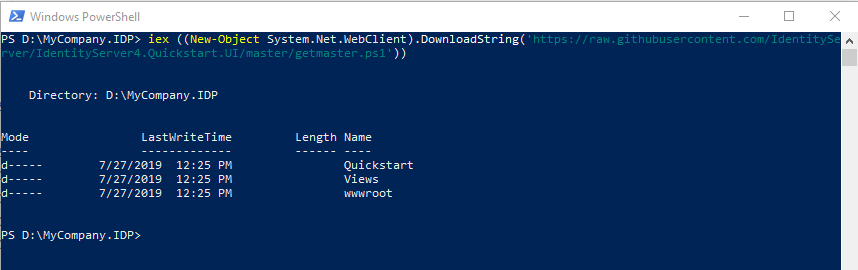
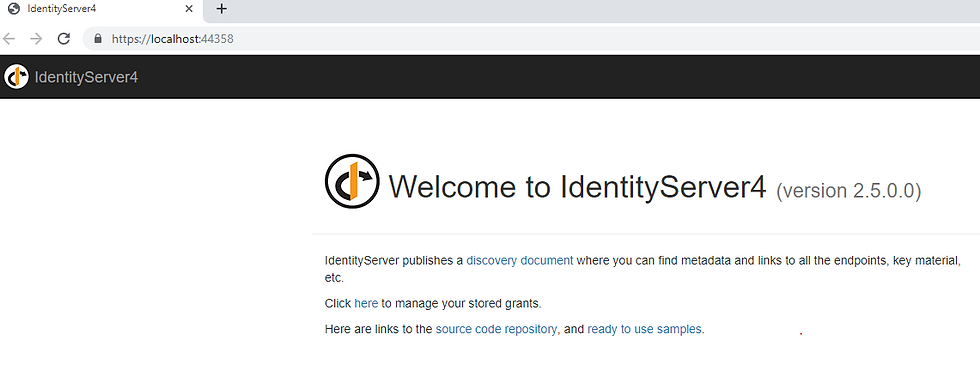
This will add all the logic and views into the IDP project. Building and running the project now should open up the IdServer interface 😁
With the QuickStart project available, go to QuickStart -> Account ->AccountOptions and set "AutomaticRedirectAfterSignOut" to true.
Now that we have configured the IDP, next section is to configure the Client side of the React app in MyWebApp. For this I'm going to switch over to VS Code. It is not necessary and is solely your preference. Open the ClientApp folder in VS Code.
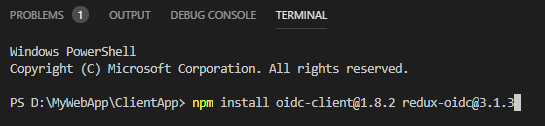
Use the windows powershell and navigate into the ClientApp where the Package.json resides. Let's add two packages to work with Open Id Connect:
For this project the following versions were used:
oidc-client : 1.8.2
redux-oidc: 3.1.3
Next up is to create the UserManager file which contains all the configuration for connecting with IdServer. Create a utils folder inside src and create userManager.js. Use the same configuration used in the IDP. Make sure the uris specified for the application and the IDP app are correct.
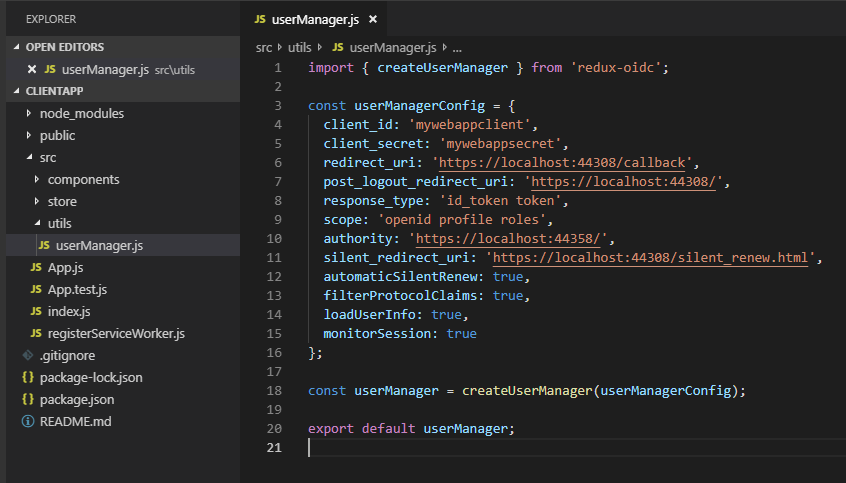
Note that we are using the implicit workflow in this project. You can make small tweaks on the response type to change into hybrid flow or any other preferred workflow.
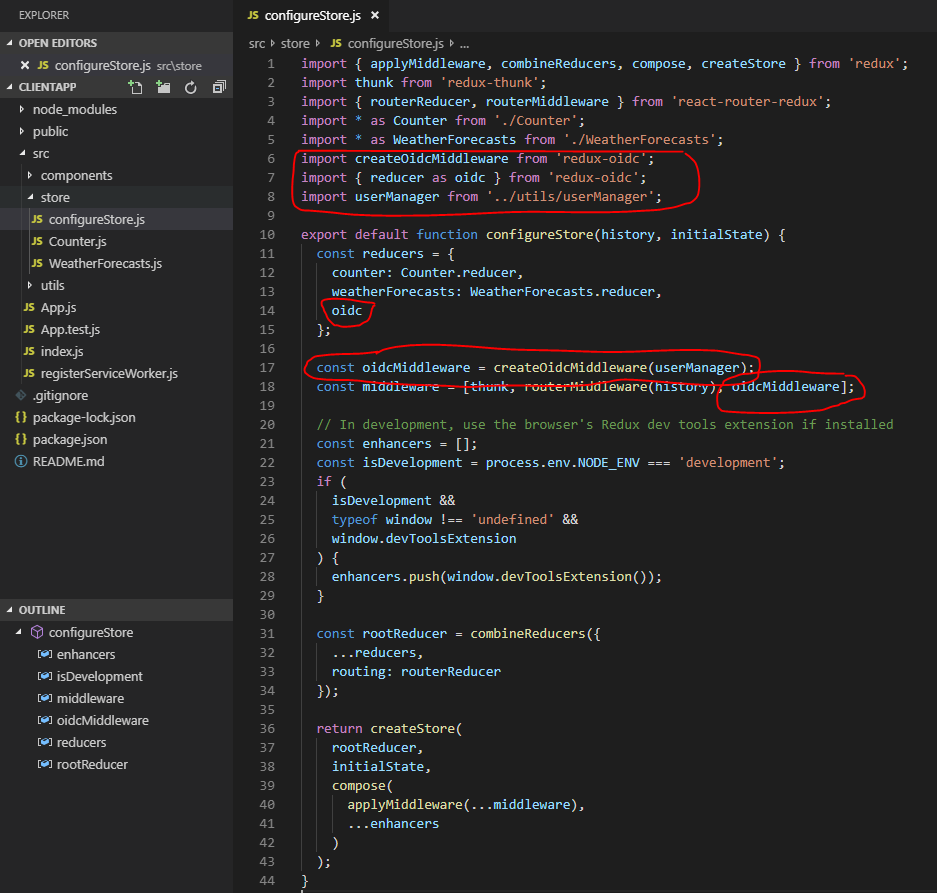
Now that we have the packages, let's add the configuration onto the Redux state. Go inside the src -> redux folder and open configureStore.js. Let's do the following steps:
Import createOidcMiddleware, oidc and the newly created userManager
Add the oidc object into the reducers
Create a new OidcMiddleware with the userManager configurations
Pass in the oidc middleware into the store
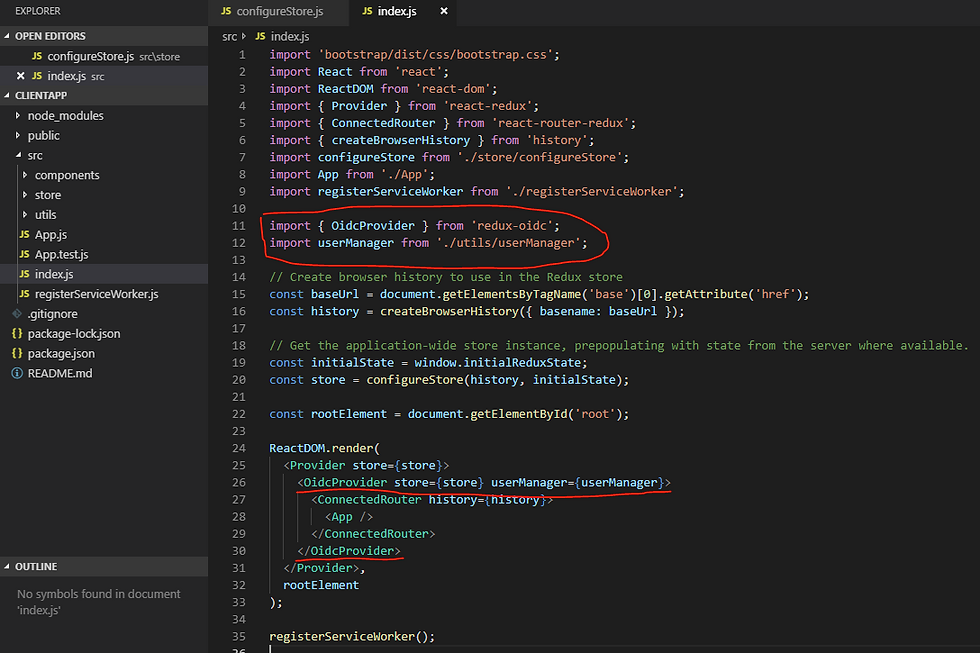
Now let's introduce the oidc provider into the index.js file
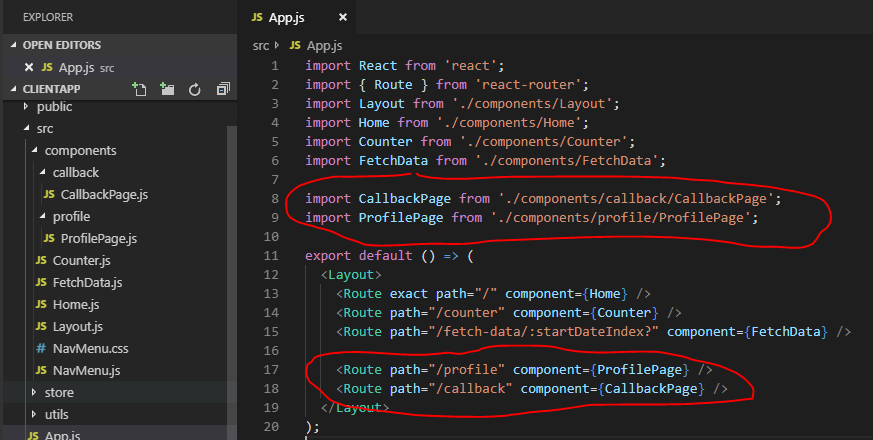
Now that we have the boiler plate set up, we can start introducing the first two pages. The first page is the callback page used to store the access token and user details passed in from the IDP. I prefer having components in separate folders, but it's all down to your preferred choice 😊.
Create a new folder called callback inside components and add the CallbackPage.js file.

The next page to create is the profile page. This is used just to demonstrate how the logged in user details are stored. Create a new folder called profile inside components and add the ProfilePage.js file
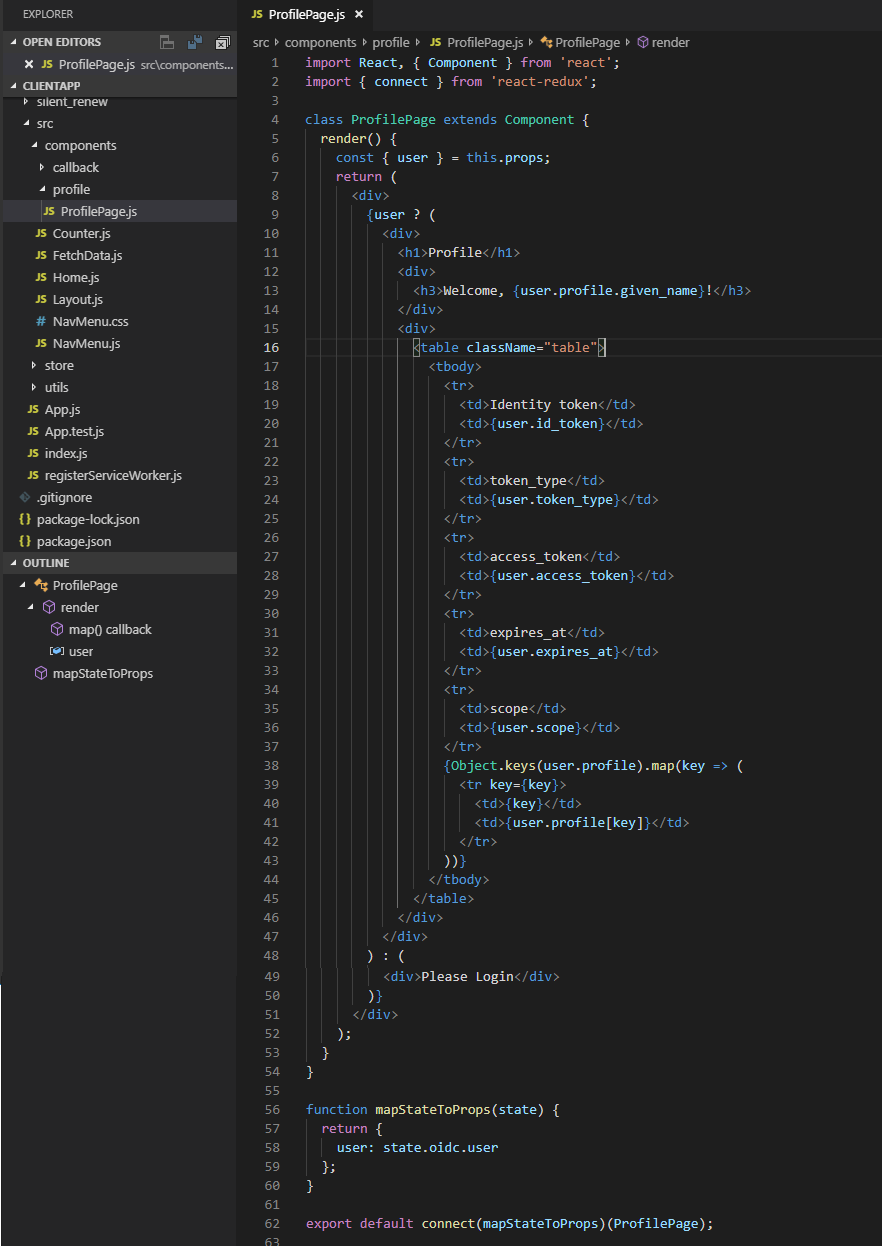
Notice that we are getting the user details from the redux state here and simply displaying all the details through a table.
Now that we have the two pages set up, let's add them to the App.js
The final piece is to set up the login button on the NavMenu.js file inside components. Let's implement the following:
Grab the user state from redux and map it to props. Also create a flag checking if the user is authenticated based on the token
Create two methods for login and logout used in the button
Create an additional variable to check if user has an 'Admin' role (not implemented in this project)
Add the login and admin button as Nav items

And that's it! 😁. We have set up the two projects to work together. Switch back to visual studio so that you can debug the application in https. Make sure that both application run together. To do that : RC -> Solution -> Properties -> Startup project -> select Multiple startup projects and set both the applications to start.
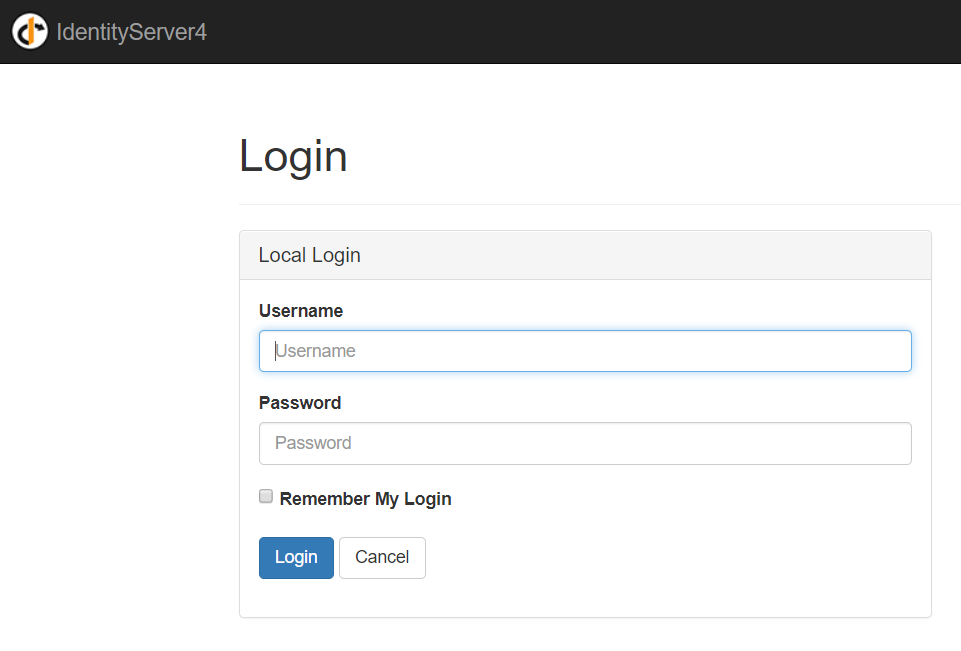
Build the solution and run it. You can observe both websites opening up. Now click on the login button of your client application and it will redirect to the IDP project.
Important: If you receive an error saying "invalid client details", check whether all the urls are correctly specified. Sometimes you might encounter weird CORS issues. If so the quick fix would be to go to the Startup.cs of the IDP project and allow any origin to get the project running.
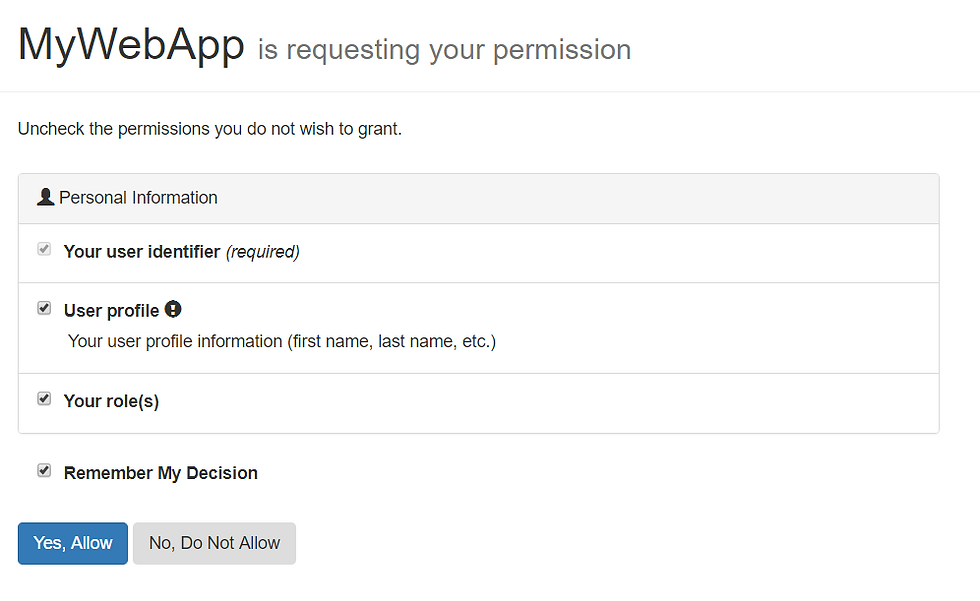
Let's enter the user details of the user who has the Admin role. IdServer will ask for permissions and redirect back to the home page.
Note that the name of the user and the button changed to Log out. Also admin user will have the extra Admin button (not implemented). Logging in as the other user will not show the admin button.
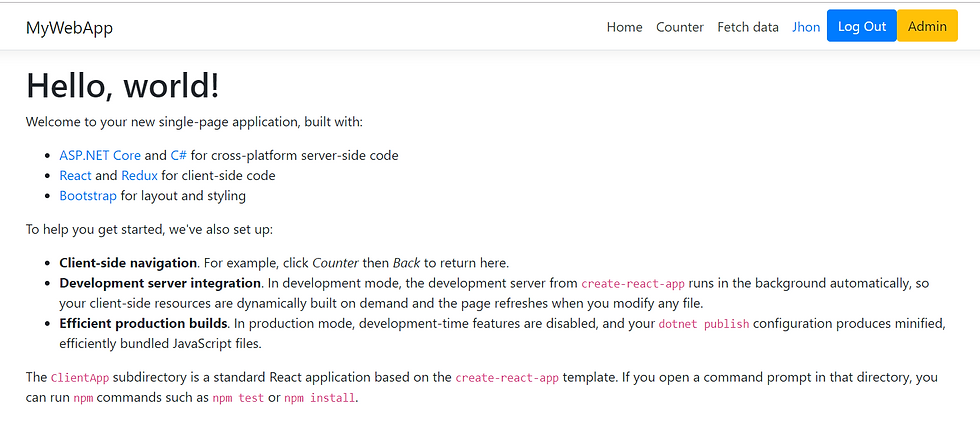
Clicking on the Name of the user will show all the user details. Logging out will return back to the home page.

With that, the first part of this post is complete 😎. In the next post, we will look at how to use these access tokens to call API endpoints and work with data. I hope you enjoyed the post 😅. Since this was my first, please drop a comment on ways to improve this post and that will help others benefit from this article.
Related Content
These are some helpful links for additional reading: